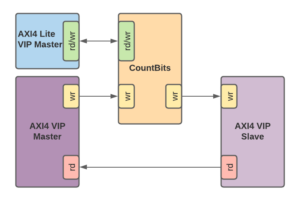
Part one and part two of my FPGA series went over the RTL required to support an AXI Lite register block, a custom block of RTL which counts bits on the fly over an AXI Full bus. Part three covered the simulation of these components using Xilinx’ AXI VIP block. In part four I’ll be integrating the count bits IP into a project and implementing a kernel driver to support interfacing/controlling count bits.

Above is a not so clear diagram of the CountBits RTL block integrated into a project that has BRAM (Block RAM) used to store data from the Zynq processor, moved through the CountBits block. This will give us a chance to test CountBits out in hardware as well as control it from within petalinux. For information on petalinux, refer to my previous post on the subject.
Table of Contents
Character Device Driver
When I first started kernel driver development, I found it all a bit confusing. It wasn’t clear to me whether there was a standard method to go about writing a basic driver, whether the path I chose was the most optimal, or even the most modern method. When searching for function definitions, I’d run into definitions that were outdated, and methods that, once supported, were now deprecated from the kernel. Sure, you’ll see links to Linux Device Drivers, 3rd Edition as if that’s some sort of easy solution to all questions, but even that seemed outdated. I did find Linux Driver Development for Embedded Processors – Second Edition to be probably the most helpful book, but even that book was less thorough on the basics and more of a source for memory/DMA related practices that I ran into later on. Another decent online resource here details some of the common APIs and structures used in device drivers. Hopefully this post can be of help as an introduction to character device driver development and a way to cut to some of the core concepts that are useful when needing to get a driver working quickly. With that, a very basic character device driver for controlling CountBits can be found here. Let’s break it down into its more important parts for better understanding. First, how does the driver know when to get loaded?
static struct of_device_id cbctrl_of_match[] = {

{

   .compatible = "xlnx,CountBits-1.0",

},

{ /* end of list */ },

};

MODULE_DEVICE_TABLE( of, cbctrl_of_match );
The .compatible string is used to specify what device should use this driver. How is this specific string known? It ultimately comes from the pl.dtsi file (or a custom dtsi file if you’re using device-tree overlays):
/ {

     amba_pl: amba_pl@0 {

         #address-cells = <2>;

         #size-cells = <2>;

         compatible = "simple-bus";

         ranges ;

         CountBits_0: CountBits@400000000 {

             clock-names = "axil_aclk";

             clocks = <&zynqmp_clk 71>;

             compatible = "xlnx,CountBits-1.0";

             reg = <0x00000004 0x00000000 0x0 0x2000 0x00000020 0x00000000 0x0 0x4000>;

         };

     };

 };
This means that any device found with this compatible string, including mutliple devices, will use this driver for configuration. Practically speaking, this means that this driver’s probe function will be invoked if and when this device is detected.
probe()
The first function that’s called when a driver is invoked is probe():
static int cbctrl_probe( struct platform_device *pdev )
In this driver, probe is given a platform_device pointer which, among other things, contains the device, which is ultimately used to map, register, and allocate resources. In this particular case, probe() can be found first allocating memory for the driver data.
r_mem         = platform_get_resource( pdev, IORESOURCE_MEM, 0 );

lp->base_addr = devm_ioremap_resource( dev, r_mem );
This would also be where an irq handler would be setup, however, this particular driver has no need for one (see commented out code for reference). Next is setting up the character driver, which essentially allows the device to be found in /dev/<chardevice>. First is allocating a region of character device numbers, in this case, a base minor of 0, and a single device with the name, “cbctrl”.
rc = alloc_chrdev_region( dev_node, 0, 1, "cbctrl" );
The file_operations structure is then linked to the device, and the device is added.
cdev_init( cdev, &cbctrl_fops );

cdev->owner = THIS_MODULE;

rc          = cdev_add( cdev, *dev_node, 1 );
For reference, the file_operations populated in this particular character device driver is shown below. This structure is where functions supporting standard operations such as open, release, mmap, ioctl, etc… are assigned to the driver. These functions will be discussed in more detail later.
static struct file_operations cbctrl_fops = {

    .owner          = THIS_MODULE,

    .open           = cbctrl_open,

    .release        = cbctrl_release,

    .unlocked_ioctl = cbctrl_ioctl,

 };
Finally, the class is created, in this case, “cbctrl”, and the device is created allowing us to find that device under /dev/cbctrl.
cbctrl_class = class_create( THIS_MODULE, DRIVER_NAME );

subdev = device_create( cbctrl_class, dev, *dev_node, NULL, "cbctrl" );
ioctl()
Arguably one of the most important tools for character device drivers is the ioctl call, especially for those just getting started in module development. This supports basic movement of data between user space and kernel/module space. ioctl calls are a great way to read and write hardware registers, share small data structures, and check various hardware related content. To understand how ioctl works, we first need to understand _IOR and _IOW definitions that can be found in the header file here.
typedef struct cbctrl_t

 {

     uint32_t cbData;

     uintptr_t cbOffset;

 } cbctrl_t;


 define READ_REG_IOCTL _IOR(SCULL_IOC_MAGIC, 1, cbctrl_t *)

 define WRITE_REG_IOCTL _IOW(SCULL_IOC_MAGIC, 2, cbctrl_t *)

 define SCULL_IOC_MAGIC 'e'
The first parameter in _IOR or _IOW is a unique identifier that can be a letter or number which allows one driver to retain uniqueness from another. The second parameter is a unique number *within* the driver, giving the driver the ability to distinguish from one ioctl operation call to the next. Lastly, a pointer to the data to write or read. This can be any type that’s known by the driver and user application, so custom structures are a great way to aggregate related data for ioctl movement. It’s also worth pointing out that _IOR is for reading data from kernel space, and _IOW is, of course, for writing data to kernel space.
switch ( cmd )

{

   case READ_REG_IOCTL:

      data.cbData = cbctrl_readreg( offset );

      rc = copy_to_user( ( cbctrl_t * )arg, &data, sizeof( cbctrl_t ) );

      break;


   case WRITE_REG_IOCTL:

      copy_from_user( &data, ( cbctrl_t * )arg, sizeof( cbctrl_t ) );

      cbctrl_writereg( data.cbData, offset );

      break;


   default:

      return -EINVAL;

}
Above is a (truncated) look into the ioctl() function found in the character driver. Both the READ_REG_IOCTL and WRITE_REG_IOCTL definitions are found in a switch statement that switches on “cmd” which is passed in as a parameter in the ioctl function. There are 2 functions that move data between user and kernel space, copy_to_user() and copy_from_user(). Really these can be thought of as memcpy. In copy_to_user for example, the first parameter is the destination (arg), the second parameter is a pointer to the data to be copied to the first parameter, and the last parameter is how much data, or size in bytes, to copy. copy_from_user simply has parameters 1 and 2 switched. In the implementation above, a custom data type is moved which has an offset, and data, allowing a generic way to read and write hardware registers.
remove()
The final function invoked upon exit of the driver is .remove, in this case, cbctrl_remove(). Diving down into what it ultimately does, you’ll notice it is essentially reversing what was done in probe():
device_destroy( cbctrl_class, *dev_node );

class_destroy( cbctrl_class );

cdev_del( cdev );

unregister_chrdev_region( *dev_node, 1 );
The class and device is destroyed, the character device is deleted, and the registered node is unregistered.
As you can imagine, there is so much more to device drivers. Handling multiple instances of the same device type, DMA buffers and mmap, timers, threading, read and write, just to name a few. This is the start of a learning journey that has a wide range of possibilities, but understanding the above basics will take you far into enabling the use of hardware in linux.


